What is an Awning Bunk Window?
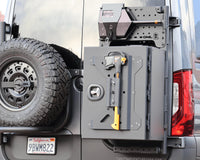
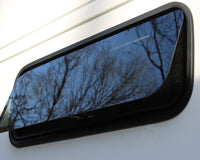
An awning bunk window is commonly used in the driver side rear quarter panel of camper vans to allow maximum ventilation over the bed or "bunk" area. Awning windows are hinged at the top and open outward, resembling an awning.

New clamp-in AW3310 Window from Van Windows Direct offers upgraded features compared to popular clamp-in 10"x33" awning bunk windows such as CR Laurence (CRL) AW1033 and Flarespace FS1033 windows.
Van Windows Direct AW3310 Comparison to CR Laurence AW1033:
VWD AW3310 |
CRL AW1033 |
|
|
See our Bunk Window Comparison Chart and All About Bunk Windows articles to compare more camper van bunk windows: Tern Overland (Arctic Tern windows), AM Auto, CR Laurence, Flarespace and Van Windows Direct side by side.

What is a Clamp-in Window?
A clamp-in window refers to the installation process of clamping and compressing the interior ring with the exterior window frame. Clamp-in windows like the AW3310 include 5 parts: the exterior window glass frame, exterior gasket seal, interior clamp-ring, mounting screws, and mesh screen attachment.
What We Love About Clamp-in Windows:
- Quick install
- No adhesive needed
- No drying time required
Why Install an Awning Bunk Window?
Installing an awning bunk window in your RV or camper van offers several benefits. First, it allows better airflow and ventilation across, which is especially important in small, enclosed camper van spaces. Bunk windows also provide natural light, making the sleeping area feel more open and inviting. Additionally, an awning bunk window can enhance the overall aesthetic appeal of your RV or camper van, upgrading it from cargo van to camper van at little cost.
What Tools are Needed to Install a Bunk Window?
- Bunk window
- Gasket (included with window)
- Clamp ring (included with window)
- Screws (included with window)
- Bunk window template
- Drill & metal drill bits
- Philips screw driver (hand-tighten all screws)
- Step bit
- Jigsaw with fine metal blade
- Foam or bristle paint brush
- Auto paint/primer
- Plastic/paper drop-cloths
- Blue painter’s tape
- Safety:
- Gloves
- Eye protection
- Hearing protection
- Face mask
- Long-sleeved shirt

How to Install a Clamp-in Awning Bunk Window
Installing a clamp-in awning bunk window is easier than you think!
Clamp-in windows like the AW3310 do not require any adhesive to install and once clamped into place, are ready to drive-off, reducing both your install time and weather concerns.
Here is your step-by-step guide to help you through the installation:
Step 1: Test Window + Cover Van
Before starting the installation, it is important to inspect and test the basic awning window function and components. Be sure your frame and clamp ring are not bent, dented or warped, causing issues during installation.
Once inspected, prepare your van for installation. Tape and cover the van wall interior and exterior with paper to protect from metal debris and damages while cutting.
Step 2: Creating a Template
To ensure a precise and accurate installation for smaller van bunk windows like the AW3310, it is recommended to create a cardboard template or use your VWD clamp ring as a template for your cutout. Creating a template will allow you to determine the exact size, shape, and placement of the cutout needed for the bunk window.
Two ways to create an AW3310 bunk window template:
1. Traditional Way:
Create your own template using cardboard and your bunk window clamp ring.
- Place your clamp ring onto the cardboard with the flat edge down, as it would be when installed.
- Outline the inner wall using a bold marker.
- Cut out the outline portion. (Tip: cut along the inside line)
- Test template by laying it within the van window clamp ring. For the perfect fit, the template should not rub against the clamp ring frame. This will cause the window to rub against the cutout and will not properly fit.

2. Quicker Way:
Use your Van Windows Direct AW3310 clamp ring as your window template.
- From inside or outside your van, tape the Van Windows Direct AW3310 Awning window clamp ring in position. The ring should lay in place with the flat edge against the van wall, as it would be when installed.
- Outline the inner wall.

This method works with a Van Windows Direct AW3310 because the clamp ring is completely solid, forming a perfect template for your cutout.
Step 3: Measure and Mark Your Window Location
Be sure your bunk window template is placed and marked evenly within the van window stamp in your desired location.
To begin marking, measure from the top of your van factory window cutout down to mark the bunk window's top. Note how low you want the window given your van floor plan and bed height. Measure and mark the top line evenly across the full window width. Next, test the template along these marks to be sure positioning is correct. Once you've confirmed your bunk window placement, tape the template down and outline it onto the van wall.
We recommend measuring and marking your template outline on the van's interior to give yourself more room for error or corrections, before repeating the outline location on the exterior. There are many ways you can streamline and speed up your install, if you're familiar with van window installations, but we recommend first-time installers:
- Measure and mark the template location on the inside van wall
- Drill pilot holes in each bunk window corner (see Step 4)
- Align and repeat outline for the bunk window template on your van's exterior van wall (see Step 4)
Step 4: Preparing Your Cutout
Once the template is outlined on the interior, remove the template and drill 2-3 pilot holes in each corner of the outline. These holes will serve as corner guides for the cutout.
Tip: be sure your pilot holes form the corner shape correctly and align with the template identically on the exterior.


On the exterior, confirm your template aligns with your piloted corner holes. Once aligned, tape your template to van exterior and outline the cutout on the van's exterior wall.

Next, switch to a step bit and pilot one hole in each corner of the template. These larger holes will allow you to easily insert a jigsaw blade for cutting.
Step 5: Cutting Out the Window
Using a jigsaw and metal blade, make the cutout starting with the top and bottom widths. Next, place blue tape vertically across the height of the window cutout and continue cutting, rounding the bottom corner up the window to the top corner on both sides.

It is difficult to trim down your window cutout once the first cut is made. Take your time and follow the template closely to ensure a clean and precise cutout. Once your cutout is completed, test fit your bunk window to make sure there are no additional cuts needed prior to continuing installation.
Tip: If you're nervous about cutting the perfect window cutout, don't skip creating a cardboard template. Using your cardboard template, test fit the "cutout" with the bunk window clamp ring. Be sure the cardboard template can slide into the window clamp ring without rubbing against the clamp ring walls (reference Step 2 & 3).
Step 7: Prepare the Cutout for Install
Before installing the AW3310 awning bunk window, you need to finish preparing the window cutout. This involves filing or sanding the raw metal edges to ensure a smooth and even surface. Be sure to clean away any metal dust/debris after sanding.
Next, apply an automotive or appliance primer and paint to the raw metal edge using a foam or bristle brush. This will help to protect the metal from rust and corrosion, ensuring the longevity of your window installation.

Step 8: Install Gasket + Pilot Screw Locations
Install your Van Windows Direct's AW3310 Awning Bunk Window's gasket seal prior to installing the window.
Starting at the bottom center of the window, simply peel the red protective backing from the gasket adhesive and lay the gasket into the track using the embossed outline as a guide. Finally, cut the end to meet the center starting point.
Next, you'll need to pilot your screw holes on the bunk window frame. First, align the trim ring correctly on the AW3310 awning window and pilot screw locations on the window frame using the pre-drilled screw holes on the window clamp ring. This will ensure that the window is properly aligned and secure once the screws are hand-tightened into place.

Step 9: Install the Window + Clamp Ring
With the help of a friend, place the window in the cutout from the outside of the van while another worker on the inside compresses it with the clamp ring.
Check again to be sure the window fits securely within the cutout, and is not bowing or putting pressure on the van wall. If you experience fitment issues, check to see what areas need to be trimmed back. You can use your clamp ring again here as a template and mark any outstanding areas.
Step 10: Hand Tighten All Screws
Finally, install your provided screws into the clamp ring one at a time. Make sure to hand tighten them one at a time, but do not fully tighten until all screws have been installed. It is important to pre-drill or pilot your screw holes into the frame because you do not want to force the screw into the frame, causing the threads to wear or screw to break. Over tightening the screws with a drill or forcing them into the frame could also strip and damage the screw, requiring replacements.
Once all screws are installed, fully tighten each again by hand to ensure that the window is properly fastened and sealed.

Step 11: Test for Water Leaks
Once the installation is complete, it is crucial to test for water leaks. Use a hose or a bucket of water to simulate rain and direct a gentle spray of water onto the van wall above the window. Observe the interior of the RV for any signs of water leakage. If you notice any leaks, work through the following steps:
- Check the gasket. Be sure it is fully compressed on the exterior van wall.
- Check the screws. Confirm all screws are tight and your clamp ring is even with no gaps.
Step 12: Install AW3310 Screen
Once your install is complete and inspected for proper operation and water leaks, easily attach your AW3310 screen to the window frame by aligning and compressing the velcro.

Summary
Installing an awning bunk window in your RV or camper van can greatly enhance the comfort and functionality of your sleeping area and your entire van. By following the step-by-step guide outlined above, you can successfully install an awning bunk window and enjoy the added benefits. Remember to take your time, use the proper tools, and follow all safety precautions during the installation process.