EcoFlow's Power Kits reimagine the traditional van electrical system, simplifying nearly every aspect with their easy to use plug-in cable system. The batteries, shore power, solar, and even alternator power connects directly to the EcoFlow Power Hub, which takes the place of many components like the inverter and solar charge controller and streamlines design in one neat hub.
Your EcoFlow Independence Power Kit will come with everything you need for your van's simple power system and will be completely ready for install. You'll just need to secure the brackets and connect your wiring, and you're ready for instant powering. Plus, if you're looking to add in larger appliances you can tie in to the distribution panel with just a few, quick modifications.

5 Things to Do Before Installing
- Start by planning your wire layout in combination with your power kit. Components will need proper spacing and will need to be installed within cable length.
- Read through the EcoFlow Power Kit Installation Instructions
- EcoFlow LFP Battery User Manual
- EcoFlow Power Hub User Manual
- EcoFlow Power Kit Console User Manual
- EcoFlow AC DC Smart Distribution Panel User Manual
- Plan for the power you'll need. Consider appliance consumption and power needs (AC, refrigerator, lights, plugs, etc.).
- Test your Power Kit layout by placing components and measuring space requirements. Your kit will include spacing diagrams for the EcoFlow Power Hub and Battery.
- Understand power capacity and installation for larger 48V/24V/12V appliances. See our articles EcoFlow Power Kits and RV Air Conditioners and EcoFlow Power Kits: Power Everything Easily.
Setting up Your EcoFlow Power Kit
Your Independence Power Kit will include 4 main components:


1. Setting Up the EcoFlow Power Hub:
Installing your Power Kit is simple! Start with installing your Power Hub. Note the provided diagram for required ventilation space, bracket placement, and be sure you're installing in a well ventilated or open cabinet.
Next up, use the Power Hub brackets to install your Power Hub. First mount the hub support bracket to the wall, and slide the Power Hub onto the bracket for support. Once your hub is in place, install additional two brackets to lock the hub in place.
Finally, connect and route the AC-out and DC-out lines from the Power Hub to the Smart AC/DC Distribution Panel by plugging them into the right side of the Power Hub and preparing to secure onto the AC and DC connections inside the panel.


2. Setting Up the EcoFlow Smart AC/DC Distribution Panel
The distribution panel installs with the same technique as the power hub. You'll simply mount the install brackets onto the panel box and mount onto the wall, or you can create a flush-mount panel design by inserting the box into a wall cavity and screwing it down from the side supports.
Next, knock out necessary panel holes for wiring (at least two bottom knock-outs for the AC Out and DC Out connections as well as at least 2 side knock-outs for wiring into the panel), and mount the panel using the support bracket or support walls in place.

From the EcoFlow install guide you'll note your ground, positive and negative locations within the panel and can easily snap in your wiring when ready to install.
Lastly, the AC Out and DC Out wires connect using the provided screws (noted in your install guide) to the panel. Three AC Out wires connect on the lower left panel section and two DC Out wires connect on the lower right section.

3. Setting Up the EcoFlow Power Kit Console:
Now that your main components are installed, you're ready to mount your Power Kit Console.
The console is a vital look into the system's charge and discharge rates. You'll be able to see and even name input plugs and other connections through your console and EcoFlow app, and can turn power connection off with a swipe.
To install, you'll locate your ideal location, drill a hole through the cabinet or wall for wiring, if needed, and mount the console using the included mounting bracket.
TIP: the bottom of the bracket will be even with the console screen once completely mounted. Once secure, slide the console onto the bracket.
To complete your set up, you'll connect the CAN bus port cable to the back of the console and to the CAN bus port on the Power Hub. Be sure to follow EcoFlow's install instructions for information on which port connects to the console and to the distribution panel.

Connecting the EcoFlow AC/DC Distribution Panel and Console to the Power Hub:
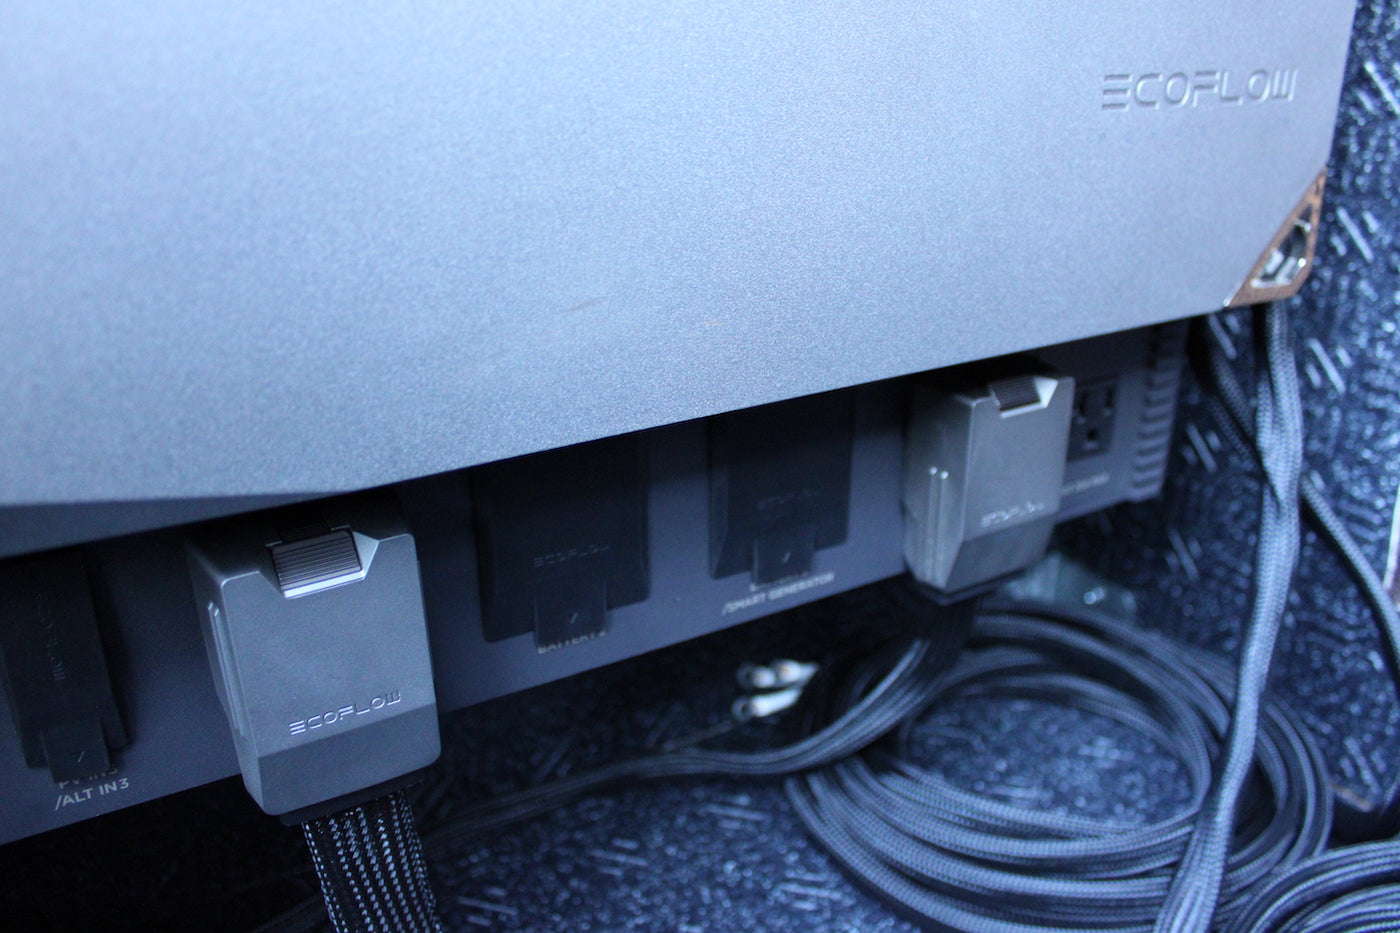
Once you've confirmed your AC and DC wiring is properly installed to your Distribution Panel and you've ran your AC and DC Out power connections to the Power Hub, you'll install the charging cables to the face of the Power Hub (AC In, solar PV In cable, ALT In cables.)
Note: do NOT connect the battery or begin charging until all cables and connections are installed properly and complete.

Connect cables in the following order:
- Connect AC/DC Out cables (connect to distribution panels)
- Connect AC In cable (shore power) if applicable
- Connect PV In (solar connection) if applicable
- Connect ALT In (alternator cable) if applicable


4. Setting Up the EcoFlow Battery:
Install your EcoFlow Battery using the battery diagram. Note the proper spacing surrounding the battery, mark your bracket screw holes using the diagram, and install your brackets.
Install 3 sides of the bracket then place the battery inside the brackets, and install the final support bracket. Next you'll need to strap the battery down with the provided safety strap, locking the ends in place within the bracket on both sides of the battery and pulling the strap length so that it fits securely.
TIP: When stacking multiple batteries, install and plug in the battery cable to the bottom battery before mounting the second battery. DO NOT plug in your batteries to the Power Hub until all components are completely installed.
Lastly, once ready to power up your EcoFlow Power Hub you'll connect the battery to the hub using your battery cable(s). This cable connects easily to the top battery port and to the battery port listed on the hub.
WARNING: DO NOT connect your battery cable until all other the power kit components and wiring is complete. Your system will turn on briefly and has a live connection once the battery is connected.
Now that your battery is connected, you'll see your console screen turn on briefly. Pressing the Power Hub's power switch for 2 seconds will turn the hub on, and you'll see the inlet and outlet lights blinking on the unit and the console screen power up.
Powering Up Your EcoFlow Power Kit
The Power Kit should arrive with 30% battery life. Once your setup is complete and connections are correct, connect and charge your battery fully by plugging into to shore power (AC), solar (PV), or Alternator (ALT) and switching on the correct power supply input from the "Input" screen.
TIP: For a consistent charge rate on 2 or more batteries you must discharge all batteries to 0% and recharge all batteries together fully.
Your power console will show the overall charge time, charge rate input, and power consumption.
Once you're ready to use your system, switch on the AC or DC from "Output" to turn on either or both of your outputs. You can choose either AC or DC output as needed, or leave them both off to conserve power.
TIP: The Power Hub will continue to pull power from the battery even when the AC and DC out line is off. To conserve energy when not in use and charging, turn off your Power Hub using the power button on the hub. Hold button for 3 seconds and wait for blinking lights to stop and fade to confirm the unit is off.
Summary
Setting up your EcoFlow Power Kit is now complete, and ready to enjoy! As your EcoFlow headquarters we're here to help you understand these components and install the right kit for your needs. Reach out to our support team through chat, email or phone with any additional questions.
We're here to help support, provide technical assistance, and troubleshoot issues to complete your install easily.
Shop EcoFlow Power Kits Here
Watch our Campervan HQ tutorial below for more information on setting up your EcoFlow Independence Power Kit.
Note: This guide does not take the place of EcoFlow installation instructions, and is only meant to provide a summary of installation and visual guide in combination with EcoFlow installation instructions. Please reach out to our support team for more help and additional information support@campervan-hq.com.