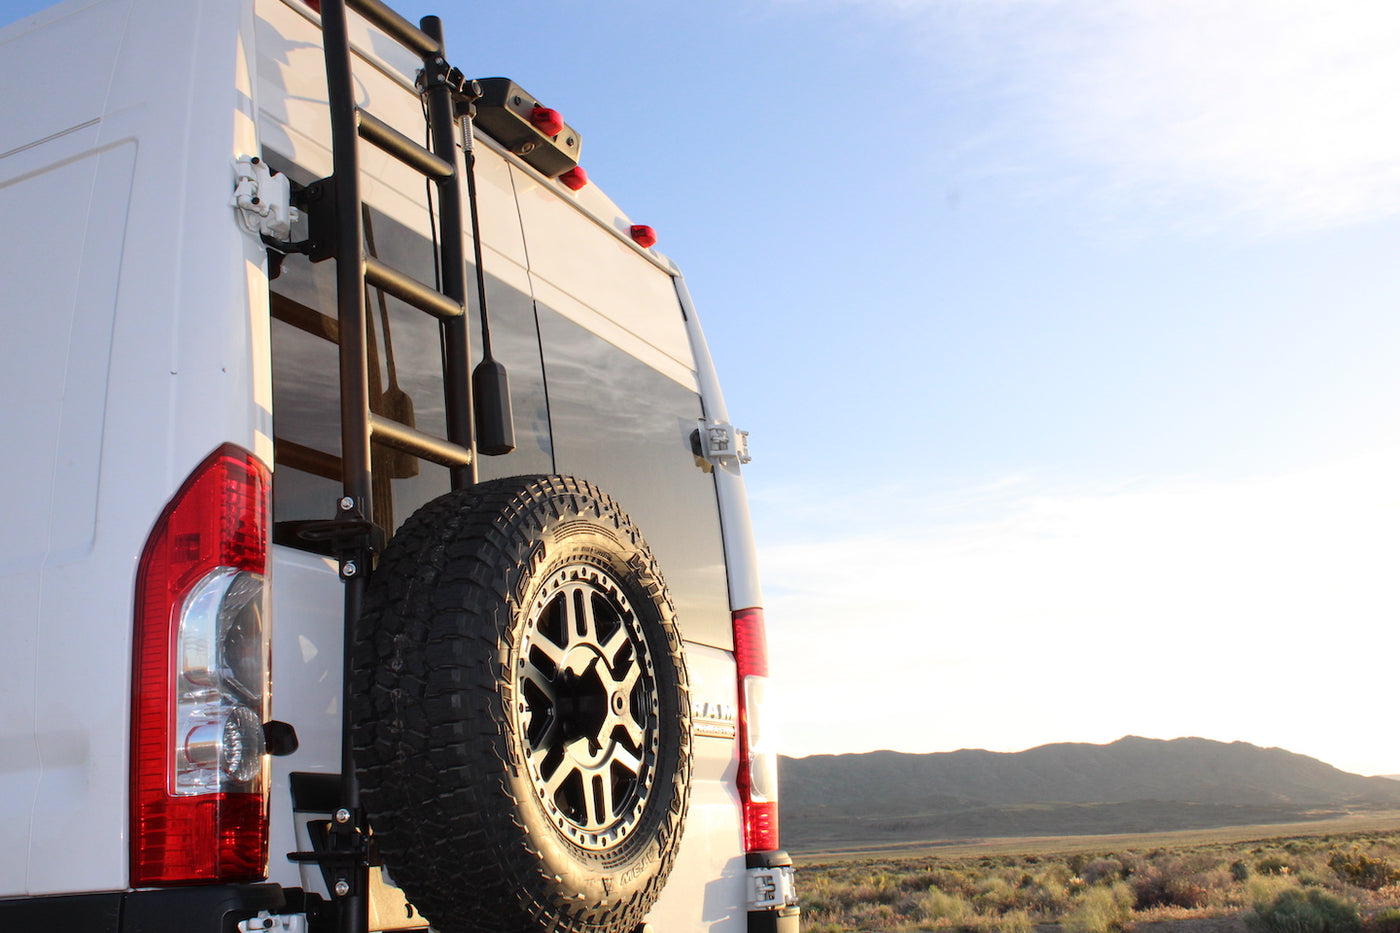
The Aluminess Ladder and Tire/Box Carrier takes the place of multiple accessories in a single, easy install. Combining a roof accessible ladder, tire or box carrier, and possibility to add-on more accessories lets you reduce wind noise from a side-mounted ladder and access more gear or your spare tire quickly.
In this guide, we're detailing a ProMaster Ladder and Tire/Box Carrier installation step by step. See Aluminess Install instructions below for your specific van model:
Ram Promaster 2013+ Rear Door Ladder Install Instructions
Mercedes Sprinter 2019+ Rear Door Ladder Install Instructions
Mercedes Sprinter (2007-2018) Rear Door Driver Side Ladder Installation Instructions
Ford Transit 2015+ Install Instructions

How to Install an Aluminess ProMaster Rear Door Ladder and Tire Carrier
Let's break it down in a few easy steps. First, you'll need to grab the right tools.
What You'll Need to Install:
- Standard and metric wrench set
- Standard and metric socket set
- Standard/Metric Allen Keys or Hex Sockets
- Torx bit set
- Breaker bar (Strongly advised not to use an impact gun)
- Tin-snips or Heavy Duty Cutting Pliers (For cutting weather stripping)
- Isopropyl Alcohol
- Baby Soap or Dish Soap
- Spray Bottle
- Clean Rag
- Squeegee (or old credit card)
- Vice grips
- Door panel plastic rivet puller or Flat Head Screw Driver
- Scissor/Floor Jack (Optional, for supporting door)

Next up, you'll need to support the door's weight while removing 1 hinge at a time to install each rear door hinge bracket. Set up a jack system or similar to support the door fully and safely while installing the brackets onto the hinges.
Then use the provided protective tape, soap and water mixed spray bottle, and a squeegee to install the tape on the door, lining up with the hinge brackets.


Prep the Rear Door with Protective Tape:
- Cut the supplied protective tape into one – 4.5” section, one - 3” section, and one -7” section. Round all corners.
- Apply the protective tape to each location, one at a time.
- Prepare the surface for protective film application (wet application technique):
- Clean the area around each hinge with isopropyl alcohol and rag.
- Wash your hands thoroughly.
- Do not apply in direct sunlight
- Apply in temperatures above 60 F. Create two separate wetting solutions: Soap/water: ~95% water / ~5% soap and Alcohol/water: ~75% water, ~25% isopropyl alcohol
- Spray the surface thoroughly with soap/water solution and do not wipe down surface.
- Remove the liner from the protective tape while spraying the adhesive side with soap/water solution.
- Apply the protective tape to the outside of the door. At the upper and lower hinge location, leaving approximately 1⁄2” of tape overhanging to be wrapped around the edge of the door. Leave the tape overhanging for now.
- Use squeegee all air bubbles out starting at adhered edge.
- Use the alcohol/water solution to speed up adhesion at one edge (lift section up and spray adhesive side) as needed.
- Wrap remaining protective tape around the door underneath hinge if possible.


Installing the Rear Door Brackets:
- Remove the two bolts connecting the upper hinge to the door.
- Rotate hinge to allow the bracket to be installed around the hinge.
- Install the bracket around the hinge in the correct orientation, lining up the 2 bolts holes correctly.
- Confirm that bracket clears the rear door glass (if applicable) and use the factory hardware to reinstall the hinge and bracket.
- Once installed, test the door by opening and closing it to confirm fitment and compatibility.


Lower Rear Door Hinge Installation:
- Remove the three bolts connecting the lower hinge to the door.
- Slide the bottom hinge bracket onto the hinge and around the hinge arm. Be sure to line up bolt holes.
- NOTE: You will replace the inner bolt with the included PN 70459 M8 Flat Head Bolt
- Repeat test clearance for new lower hinge and bracket by opening and closing your door gently.
The last step prior to installing your ladder carrier is the interior door jamb bracket. You'll need to remove your door handle and hold the inner components using a clamp or vice grip.


Inner Bracket Installation:
- Loosen the weather-stripping on the inside of the driver’s side door starting from the top and peel towards bottom of the door.
- Remove the driver’s side inside handle by removing the factory socket head bolt.
- Hold lever mounting post with clamp or vice during the installation to prevent the latch falling into the door. Once clamped remove the two factory torx screws.
- Install the inner driver door bracket using the supplied M6-1X16mm hardware.
- Reinstall the inside door handle over the bracket using the factory bolt.
Tip: Removing lower door paneling prior to starting install will allow better access to the interior door for installation.
Once your inner bracket is installed you'll need to cut away a small portion of gasket before replacing it onto the door seal and around the new bracket.


Cutting Away Gasket for Reinstallation:
- Reinstall weather stripping over installed inner bracket and mark where strip overlaps bracket. Peel back weather-stripping again and proceed to cut marked region to fit around inner door bracket. On the weather-stripping, cut the channel (attachment to the folded sheet metal) and not the bulb (hollow tube).
- Reinstall weather-stripping over the bracket ensuring cut section lines up with bracket.

Installing Rear Door Carrier onto Brackets
Now that your hinge brackets and inner bracket are mounted, you're ready to install the ladder carrier onto the brackets.
- Loosely install the rack onto the upper, lower, and inner brackets using the provided 5/16”-18 bolts, washers, and nuts.
- Tighten the upper and lower hinge brackets first, then the inner door/center bracket.
- There should be a small gap at the inner door/center bracket before tightening (0- 1/8”). If the gap is larger than 1/8”, use the provided 1/8” washers as shims (PN 70448) to close the gap to ≤ 1/8”.
- Verify the hinge brackets and inner door brackets have appropriate clearances while slowly opening and closing both rear doors.


Door Limiting Strap Installation:
To complete the install for the carrier you'll need to add a limiting strap to the interior door frame that connects to the van door. If you have a covering over your rear door panel area, remove it to access the interior door.
- Install Door Stop Channel Bracket [PN 350688] into factory threaded holes on the inside of the rear door trim using two M6-1X16mm Button Head screws.
- Thread other side of door stop strap into bracket installed on STEP 22 using 1⁄4-20 x 3” bolt and 1⁄4-20 Nylock nut.
For a ProMaster van install you'll need to remove and relocate the license plate. It's recommended to source a professional to complete the wiring for this setup.
 License Plate Relocation Installation:
You'll need the following provided hardware to complete this install:
- 1x 400508
- 2x 70462
- 2x 70060
- 2x 70002
- 2X 70461
- 2x 70009
- 2x 70008


Tire/Box Carrier Installation onto Aluminess Rear Door Ladder
Now you're ready to install the tire/box supports and mounting bracket for your tire carrier. You can also choose to mount a storage box such as the Aluminess Deluxe Box. See the diagram below for suggested orientation for supporting a box or tire installation.
Please note, to access the ladder around the tire or box you'll also need to install the 3 foldable steps included with your tire carrier kit.
Tire Carrier Support Installation:
- Start by loosening the Allen bolts from the carrier supports (part 350662).
- Note the correct orientation for the support bar as shown above.
- Loosely install one support on the left side, bottom of carrier, closest to the taillight and center it. Tighten the support bar and rotate that is level with the ground.
- Repeat install for second support, centering the support for even distribution of weight.

Tire and Tire Mounting Bracket Installation:
- Loosely fasten the tire mounting bracket into slotted center channel using 3/8" carriage bolts, nuts, and washers.
- Next test the tire on the supports and check to be sure the tire is supported by both supports and centers with the tire mounting bracket. Adjust as needed prior to fully tightening the support hardware.
- Be sure your supports are fully tightened before proceeding.
- Adjust the mounting bracket vertically until it lines up with the center of the wheel. Then attach and install the wheel wedge and wheel wedge mounts, 5" socket head bolt, and locker washer using the provided Allen key to secure the wheel.
- Once your tire is mounted in place, snap the plastic cover plug into the wheel wedge.


Foldable Side Step Installation
The included folding side steps install with Allen bolts, the same as the tire/box support arms. You'll want to consider the best fitment around your spare tire or box, and may want to install some of your steps after your tire or box is installed onto the mounting bracket and some prior to install.
- Loosely install support steps on the outer frame tubing.
- Align in preferred positioning.
- Repeat install for both remaining folding steps making sure the support steps are placed perfectly prior to fully tighten bolts.

Summary
Once complete, you're ready for adventure!
The total load weight for the Aluminess Ladder and Tire/Box Carrier is 100 lbs. We do not recommend putting weight on the ladder while the door is open, and be sure test and tighten your bolts routinely as an important part of maintenance.
Be sure to watch our Campervan HQ Install tutorial below:
Reference: