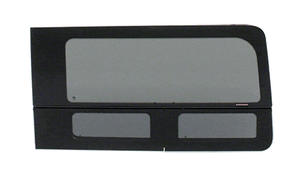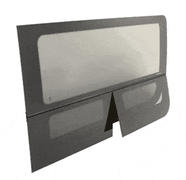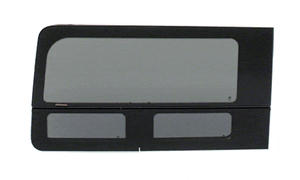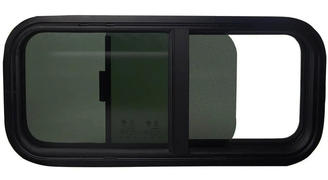

CRL Universal Van Sliding Window Passenger Side (VW1033R)
$ 29533
Unit price
/
Unavailable
Install Info
Install Info
Notes when mounting your clamp-in van window:
- Clamp-in windows can not replace factory glass windows due to the oversized cut-out.
- MUST cut window hole to fit clamp ring specifications.
- Cut the openings with a center-blade shear, rather than a jigsaw - this will cut an opening that may be less ragged, produce less debris, and produce less hammering on the sheet metal of the van.
- Make sure you paint the cut edges of the new window opening - if you skip this step, moisture can rust out the edges of the window mounting.
- IMPORTANT: these windows clamp-in place - we recommend you use hand tools to tighten these. DO NOT use power tools on the inner trim ring screws.
- See our AW3310 clamp-in install guide for more details.
FAQ
FAQ
Q1: What is a clamp-in window?
A: A clamp-in window uses an interior clamp ring and exterior frame to secure the window to the van wall—no adhesive or primer required. It’s a popular choice for DIY installs because it’s easier and faster to install than bond-in windows.
Q2: Are clamp-in windows compatible with my van?
A: Yes! Clamp-in windows are available for most popular vans including Ford Transit, RAM ProMaster, and Mercedes Sprinter. Always check product specs to confirm fitment for your specific roof height, wheelbase, and model year.
Q3: What’s the difference between clamp-in and bond-in windows?
A: Clamp-in windows use a mechanical frame and clamp ring to secure the window—no adhesive needed.
Bond-in windows use urethane adhesive for a flush, frameless look. Clamp-in windows are easier to install but may not be as low-profile as bond-in styles.
Q4: Can I install a clamp-in window myself?
A: Yes! Clamp-in windows are ideal for DIY van builders. They don’t require adhesive or curing time and include all hardware for a secure fit. Just be sure to measure carefully and follow cutting instructions closely.
Q5: What tools do I need to install a clamp-in window?
A: Basic tools include:
- Jigsaw or body saw with metal blades
- Masking tape and marker for layout
- File or deburring tool for smoothing edges
- Screwdriver for securing clamp ring attachment
- No special adhesives or primers are required.
Q6: Is any adhesive or sealant required?
A: Typically, clamp-in windows come with a rubber gasket or foam seal to prevent leaks. You may use a small amount of butyl tape or RV sealant around the frame for extra water resistance, but it’s not always necessary.
Q7: Are clamp-in windows watertight and secure?
A: Yes—when properly installed, clamp-in windows are watertight, wind-resistant, and secure for all weather conditions. Always double-check the gasket alignment during install to ensure a tight seal.
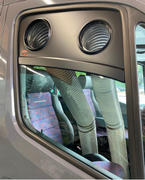
Q8: Can clamp-in windows open for ventilation?
A: Many clamp-in windows include sliding or crank-out panels with built-in bug screens. Others are fixed-pane solid glass. Be sure to check if the model you’re selecting includes ventilation features.
Q9: Can clamp-in windows be installed in vans with no factory windows?
A: Absolutely. Clamp-in windows are designed for cargo vans with solid panels and can be installed after carefully cutting the correct window openings using the included template or manufacturer’s specs.
Q10: Do clamp-in windows meet safety standards?
A: Yes. Most clamp-in windows are made from tempered safety glass and meet applicable safety standards like DOT FMVSS 205 and ANSI Z26.1 for automotive windows.
Product Specs
Product Specs
CRL Universal Van Sliding Window Passenger Side (VW1033R)
| Height(in.): | 10" cutout, 10.9" overall |
| Width (in.): | 33" cutout, 33.9" overall |
| Weight (lbs.): | 17 |
| Tint: | 28% dark gray |
| Window Type: | Fixed Slider, Screened (Clamp-in) |
| Fits: | All van models |
CRL Universal Van Sliding Window Passenger Side (VW1033R)
Product comparison grid
View moreCompare CRL Universal Van Sliding Window Passenger Side (VW1033R) with similiar models.
| Facet |

AM Auto Universal-Fit Passenger Side Half-Slider Screened Window 9.4"H x 30.7"W (UBW-RV-HSS P) View details | ||
|---|---|---|---|
| By | |||
| By | C.R. Laurence | Van Windows Direct | AM Auto |
| Price | |||
| Price |
$ 29533
Unit price
/
Unavailable
|
$ 26995
Unit price
/
Unavailable
|
$ 26425
Unit price
/
Unavailable
|
| Description | |||
| Description | Height(in.): 10" cutout, 10.9" overall Width (in.): 33" cutout, 33.9" overall Weight (lbs.): 17 Tint: 28% dark gray Window Type: Fixed... | IN STOCK! Introducing the VWD Universal Fit Half-Slider Van Bunk Window Passenger Side 33" W x 10" H (VW3310R). Featuring a solar... | Height (in.) 9.4 Width (in.) 30.7 Weight (lbs) N/A |

On Our Blog
Customer Reviews
4.5 Based on 14 Reviews
Customer Photos
- Reviews
- Questions
Filter Reviews:
DG
10/15/2024
DENNIS G.
United States
1033R & 1033L
Windows appear to be well built. Cardboard covering is not an exact sized template. Also the screws provided required predrilling which is challenging and if torx headed self tapping screws were provided the installation would be much easier. So before starting the install replace the screws with torx head screws.
TA
05/05/2023
Tony A.
United States
Good but more work than I expected
Two CRL slider bunk windows are installed with no leaks so far but I would expect a more seamless install process when paying a premium for name brand windows. Only about half the screw holes came predrilled and a few of the ones that were predrilled had missed the frame completely so I had to re-drill at a different angle.
KG
08/01/2022
Kenneth G.
United States
Excellent Product
Excellent Product. Worth the extra funds for the quality. I was surprised that the shipping material quality and overall protectiveness wasn’t that great.
ML
08/17/2019
Michael L.
United States
Installed both windows in one day
Screws were tricky to set. Was a little concerned at first on how the windows would seal without butyl tape but seems to be aok.
DS
06/17/2019
Daniel S.
United States
Installation is a challenge.
The window itself is of excellent quality. The manufacturer does not provide a template or instructions. Therefore, the customer must use the window to create a cardboard template. Do-it-yourself folks are warned that this installation does require patience and a decent level of skill with power metal cutting tools. There are several instructiuonal type videos from non-professional installers on the net.Good luck. Measure several times before you cut a hole in your rig!